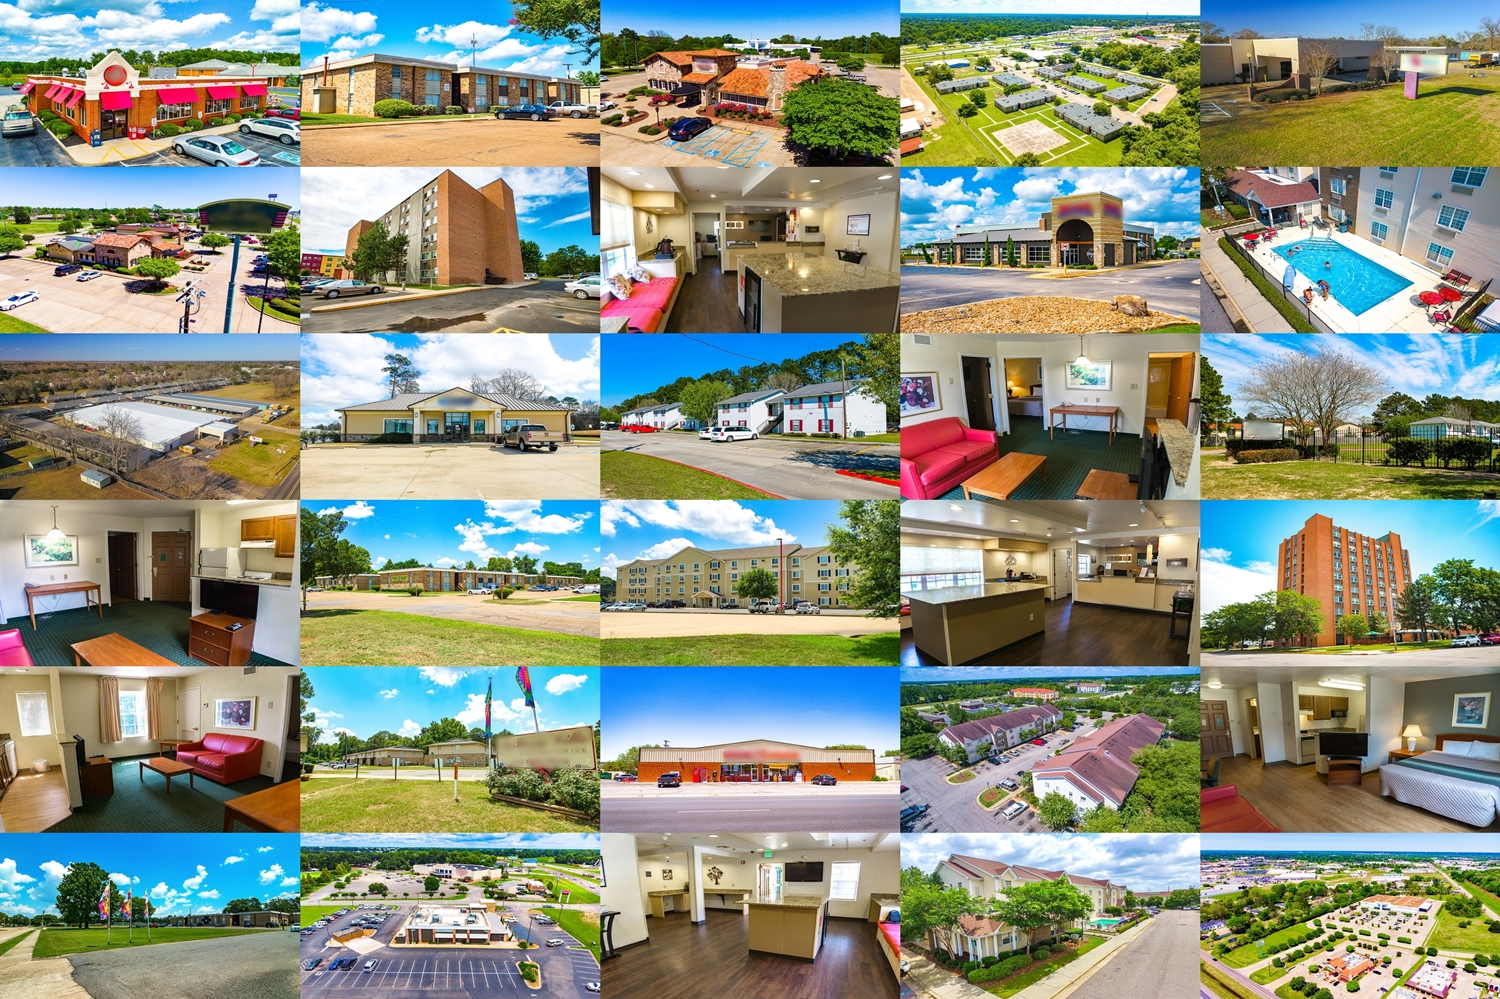
| AeroPixel Pilot Center | |||
|
|
We love what we do and we appreciate our Pilot Partners!
As an Independent Contractor it's your gig to run as you want.. so please feel free to take your time on site, but the Shot Lists and Photo Examples on this page will help you to work more efficiently and more accurately, at whatever pace you personally choose to work at. The information on this page serves as your "Blueprint" for going out and completing the job to specification.
Important Notes for Photographers:
Since you operate as an Independent Contractor, we will not be at the Job Site to supervise you or your assistants, and you will be performing the work independently and without our direction.
As an Independent Contractor, you're free to utilize FAA Part 107 Certified Subcontractors as long as they complete the job accurately. However, jobs not completed to specifications will require a reshoot.
As an Independent Contractor, you have no obligation to us and are free to work for whomever you wish.
Payment Schedule
We pride ourselves on being one of the fastest-paying companies in the industry. Where another company may have wait times of several days or a week, if not approaching two weeks between "Payment Processed" and "Payment Deposited" dates, etc..., we often pay our Pilots on the very same evening that you upload.. if not then often the following day. Here is how we typically handle payments:
Work turned in on Sunday-Thursday -- Usually paid the Same Evening or the Following Day
Work turned in on Friday or Saturday -- Usually paid on Sunday Evening or Monday
We respect you and your work, and having pay times that are at the top of the industry are one way we can show that, with more than just words!
Commercial Drone Photography -- A Line of Work with High-Paying Hourly Rates!
Few professions these days could boast of higher hourly rates than what so many Part 107 Commerical Drone Pilots are able to make.. it can definitely be a rewarding profession to be part of, even if done part-time! And here at AeroPixel, we never accept a job from a Client where we can't pay the Pilot an average effective rate of around $150/hour on-site time, based on the typical average time we find it takes to do the type of job you have accepted and the size of the property (for example being paid $120 for a small pharmacy that we find typically takes less than 45 minutes on site to photograph), and then we bear all of the burden of the post-processing, you only turn in the Raw format files and you're done. Your actual effective hourly rate with us may work out to be more or less, depending on the particular job or the speed of a particular pilot, etc. But we aim for the total job budget that we offer you upfront, to work out to a ballpark of around $150 per hour of on-site time for the first hour, and maybe a little less for a 2nd or 3rd hour on site, since multi-hour jobs are typically more of a "bulk" rate. Few in the workforce today would make half of that hourly rate. Consider the hourly rate of a Drone Pilot versus a Commercial Flight Instructor teaching people to fly full-scale aircraft:
Where a Commercial Flight Instructor might spend $30,000 or more on their education and equipment plus months or years of training...
The Point --- Let's all continue to turn out great work -- and do it safely -- so that together we can maintain the great-paying industry we've all worked to build!
*Education/equipment expenses and example pay rates obtained from websites of nationally-recognized authorities in these fields. Like any other occupation, training and expenses along with pay rates will vary and are subject to change. Always conduct your own research on these points. As an Independent Contractor, you are always free to set your own rates, but the mentioned pay rate is the average effective hourly rate that we at AeroPixel Imaging Services, LLC are typically able to pay based on the budgets we work within for our Clients. Base rate is currently $120 for the smallest properties taking approximately 30 minutes or so on site; additional factors like mileage pay, site acreage, additional services will increase the pay accordingly, meaning some projects may pay as much as $300 or more. As an Independent Contractor you are always free to require a different budget or refuse a job altogether. Likewise, we reserve the right to work with alternate photographers when the requested pay rate is beyond what we are able to cover within acceptable margins.
|
PREFERRED SKY CONDITIONS:
STILL PHOTOS ONLY -- ABOUT 75% CLOUDS OR LESS IS PREFERRED
Full Overcast may be fine too depending on the job, please check with us.
75% Clouds or less is acceptable if the job is Still Photos only, and if your scheduling won't allow for the job to be planned on a more favorable date within 4 days of your getting the Job Assignment. For many jobs, shooting with Full Overcast skies is fine too, since we can do Blue Sky Replacement where needed, but please check with us first if sky condtions will be worse than about 75% clouds, so we can confirm the Client will be good with shooting in full overcast conditions.
VIDEO INCLUDED -- ABOUT 50% CLOUDS OR LESS
Since doing Sky Replacement on Video is very difficult and often lacking in overall quality, if your job has Video included, please check with us first if sky conditions are forecast to be more than about 50% cloudy.
Please *Do Not* Shoot if the Parking Lot is Soaking Wet or has Very Large Puddles
If the Parking Lot is soaking wet or has very large puddles, most of the time the Clients -will not- accept the imagery, so please check weather conditions before heading out to the site, and of course always feel free to check with us if you're in doubt about whether to shoot or postpone.

**Check Your Work -- While still on Site!**
If you have a Laptop computer you can bring to the site, it's highly recommended to load the imagery onto the laptop and check the photos while still on site, just in case you find you missed something from the Shot List or have imagery quality problems. The inexpensive program "FastRawViewer" (shown above) is recommended for this, as a fast and easy way to view Raw files in the field on your laptop. It's hard to notice if shots are out of focus, when you're looking at them on a very small viewfinder or smartphone, so we strongly recommend taking the 5 minutes to look through your pictures on a laptop before leaving. Nothing is more disappointing than arriving back home just to realize you don't have good imagery of the most important angles of the whole shoot.
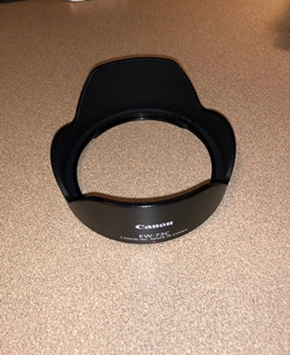
Want to greatly improve the Overall Quality of your Photography in a snap?
Spend about 20 bucks on a Lens Hood for your DSLR!
 |
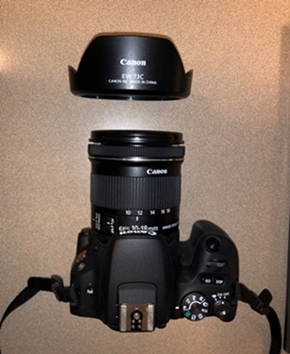 |
It really is true... An inexpensive Lens Hood can greatly improve the overall quality of your photography, helping to eliminate Sun Glare and the exposure issues that come with it. Lens Hoods can even help with indoor photography as they reduce the glare of indoor lighting showing up in your imagery, and help your camera to adjust exposure better to the overall lighting conditions in the room. The Lens Hood can also be an extra layer of protection for your lens, since it sticks out an inch or so past the lens, helping to avoid the lens contacting things and getting scratched.
The Lens Hood will screw on to the threads already existing on most all DSLR camera lenses.
Lens hoods start around $10 and can make a tremendous impact on improving the product you provide. The Canon lens hood shown above currently runs $24.95 on Amazon, including free Prime shipping.
Hint: Many lens hoods can be installed backwards over the top of the lens when you aren't using the camera, to keep the rig compact and let it easily fit into your camera bag. This way you don't need a separate compartment to store the lens hood. When ready to use, take it off, flip it around so the hood hangs forward past the lens, and put it to work!
NORMAL IMAGING TIMES
Imagery should usually be taken between 10am and 4pm Local Time for best Lighting, and to help ensure the Subject Property and neighboring businesses look busy for the photos.
Also, unless otherwise instructed, please do an internet search to be sure the business is open so the site will look busy in the photos. We like to leave things flexible for you when we can when it comes to shoot dates and times, so to help us with that please be sure the site is open and that you shoot between the time frames above, unless otherwise instructed. Thanks in advance.
Drone, DSLR Camera or Smartphone -- RAW Format if possible... but JPEG will work if needed
Preferred Image Size 4:3 or 3:2, on Drone and DSLR (this mode gives the highest resolution on most drones)
Auto White Balance
Auto Focus
Auto Exposure, with AE Lock "UNLOCKED" on DJI Go App
If using a Smartphone to take photos, please BE SURE to keep the Smartphone Camera Lens wiped clean of any fingerprints.. as we walk around with Smartphones we usually don't think about the fact that we're touching the camera lenses... which inevitably leads to hazy photos, especially when shooting in bright lighting or looking toward the sun. Take a moment to wipe the smartphone camera lenses between shots, to be sure you can take full advantage of the great cameras in modern smartphones.
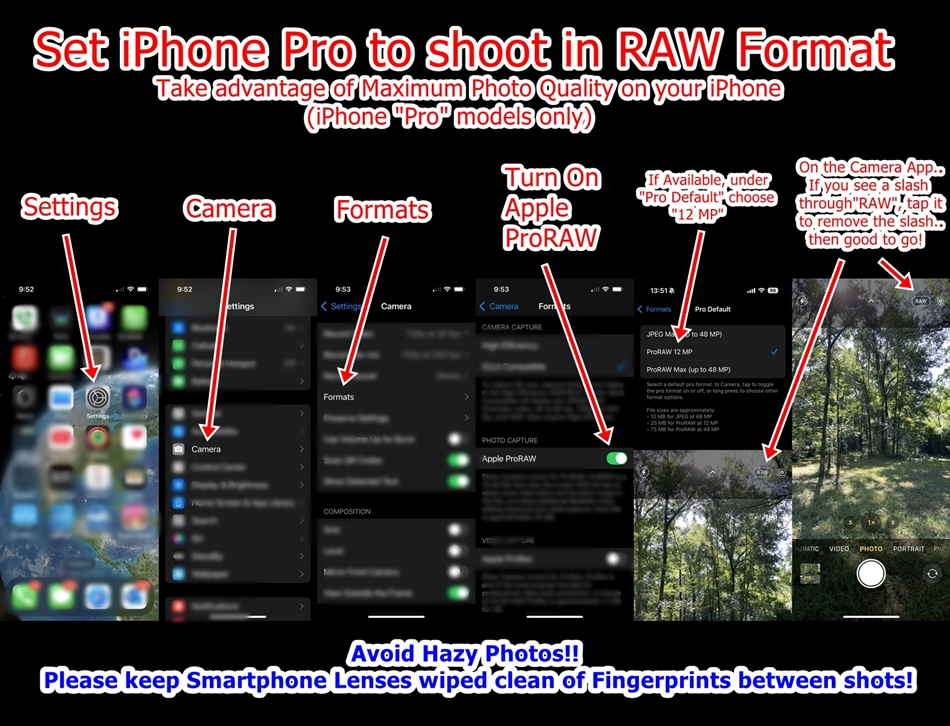
If shooting with iPhone "PRO" models.. Please shoot in 'RAW' format
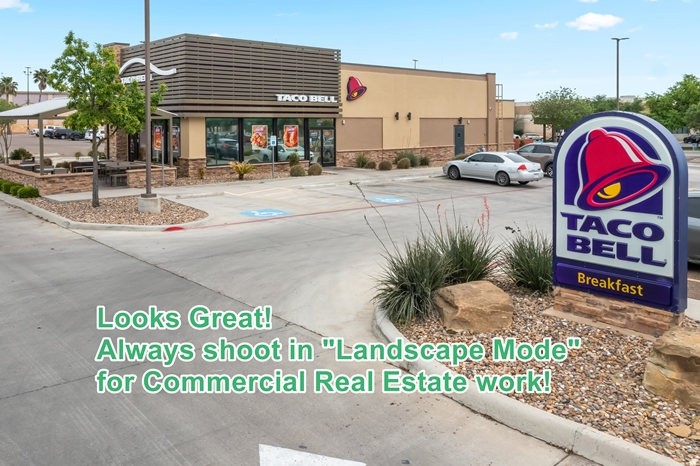
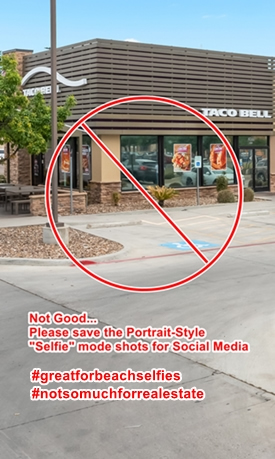
Please -- *Do Not* take shots in "Portrait Orientation" or "Selfie Mode"!
 |
|
||||
| Please, no Portrait "Selfie Style" shots... those tall narrow shots are great for selfies at the beach for your Social Media posts.. not so much for Commercial Real Estate! |
|
Instead, take the longways Landscape or 'sideways' shots... much better for Commercial Real Estate!! About the only exception might be Interior shots in tight spaces, such as an apartment bathroom. |
|||
VERIFY YOUR DRONE CAMERA SETTINGS TOO!
One of the easiest and most costly mistakes to make with still photos on a DJI drone is to adjust Image Brightness by "how bright the smartphone/tablet screen looks" while you're flying. The tablet or smartphone you're flying with may constantly be darkening or brightening itself to compensate for various things it's dealing with that have *nothing* to do with the exposure level of the actual picture you are taking....
On bright days, the smartphone or tablet you're flying with may adjust itself to be brighter to compensate and make its screen easier to see... which may lead you to incorrectly adjust EV downward because the "image" looks too bright...
If it gets too hot on that bright day, the smartphone/tablet may lower its Screen Brightness to stay cool... which may lead you to incorrectly adjust EV upward because the "image" looks too dim...
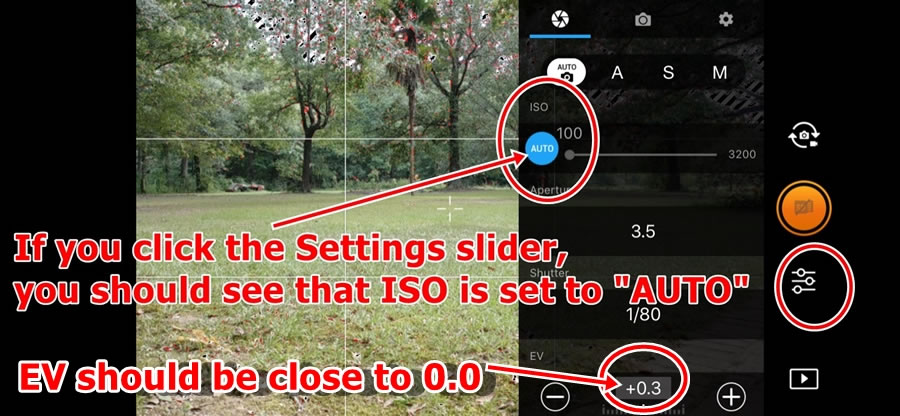
Remember... the only true, unbiased picture "image" brightness measure when operating Full Auto (as we should be on still photos) is the "EV" number (such as the "0.3" circled below). This number should always be either 0.0 or only a few tenths above or below that.... regardless of how "bright" your smartphone screen may look at that moment while you're flying. Failing to understand that will lead to overly dim or overly-bright washed-out photos.
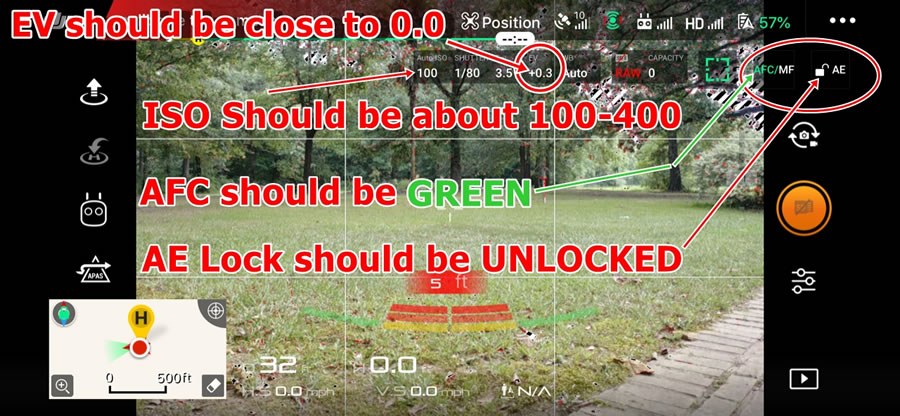
A note about Auto Exposure... For Drone Photos please MAKE SURE the Auto Exposure (AE) Lock icon on the DJI GO app is *UNLOCKED* as shown above!! Exposure Lock is GREAT for Video, but it can kill your Still Photos! If you leave it locked for PHOTOS, you can easily count on blown out, grainy drone photos when it leaves the ISO too high. For daytime drone photography on a sunny/partly cloudy day, the ISO will normally be between about 100-400, and leaving the AE Lock "UNLOCKED" will allow the Drone to take care of the ISO and Exposure settings "on the fly" for you.
VERIFY YOUR DSLR "ISO" SETTINGS
Typically, for Outdoor Photography on Sunny/Partly Cloudy days (95% of everything we shoot), you'll *always* want the camera's ISO settings to be between 100 and 400 for best overall image quality. Any higher than this and you risk having high levels of grainy "noise" in your photos! Either shoot with your camera in Full Auto (recommended), or make sure your camera shows an ISO within 100-400 for outdoor photoraphy.
For Indoor photography, Full Auto will usually give a great ISO setting automatically.. but this is where you *may* want to go manual and bump up the ISO.
Here's a short article that is very helpful on understanding ISO settings.. also has photo examples showing what different ISO settings can do (or mess up):
http://www.imagemaven.com/what-is-the-best-iso-to-use/
Lens and Filter Info
That filter sitting on the front of the drone lens might look high-tech, but in our experience for still photos they cause far more problems than they fix. Some of this is due to poor quality filters, some of it is due to improper use of the filter, or even smudges on the front or back of the filter. A bare lens works great in most every case.
Wide-Angle DSLR Lenses such as 10-18mm are PERFECT for Exteriors AND Interiors...
BUT... Please Do Not use any DSLR Fisheye Lenses that are capable of less than 10mm!
Lenses that are capable of going wider (less) than 10mm introduce too much "fisheye" into the images that is beyond being correctable, even when using Distortion Correction in Lightroom.
DSLR Photos -- Please use the Viewfinder, *not* the LCD Screen to frame your photos! That LCD screen may look high tech and it's great for reviewing your imagery, but if you use it to frame and take your photos, you'll likely end up with imagery that's more crooked and blurry. Here's a good article that goes into detail about that:
https://www.lifewire.com/dont-rely-on-your-cameras-lcd-screen-492974
And another:
https://better-photography.com/digital-photography-tip-framing-your-shot-viewfinder-vs-lcd/
**Do not use Date Stamps that show up in the Photos**
These settings are easily achievable using any modern DSLR camera or DJI drone. Please let us know if we can be of help in adjusting the settings of your equipment.
DSLR/Mirrorless Cameras: We recommend a Tripod or Monopod to ensure your photos are Level and Crisp.
SAFETY Matters Most Of All!
Always keep good Line of Sight with your drone, and *never* assume you're clear of an obstacle unless you can see visual separation from it!
If you can't tell whether you're in front of or behind (or in line with) an Obstacle... keep visual space between it and your drone, rise above the obstacle, then cross over, then come back down on the other side! Never assume you're clear to cross it unless you can visually verify space between the obstacle and your drone!
Remember -- Collision Avoidance Technology is NOT always active in all directions for all drones.. For example, with the DJI Mavic 2 Pro, the Side Collision Avoidance Sensors are NOT active unless you are flying in Tripod or ActiveTrack modes!
Fly as if you don't have Collision Avoidance technology at all!
Get LAANC Approval where it's needed.. and follow it! We'll never ask you to do otherwise.
Weather can be a SAFETY issue too! Please check the forecast and confirm it will be safe to fly -before- wasting your time driving to the site. Contact us so we can help plan for a new shoot date when weather conditions are more favorable.
****IF YOUR JOB CALLS FOR VIDEO****
Video (If required for your job): 1080p, 60 Frames Per Second, Auto White Balance (Manual White Balance/Manual Exposure optional for Video if you are proficient with it),
Auto Focus
Video should be shot in .MP4 format, **not** in .MOV format
Using the standard H.264 Compression Format
Please *Do Not* shoot in the D-Log Format
**1080p, 60 Frames Per Second is sufficient -- No need to Take 2K or 4K Video unless you are asked to do so! 2K/4K Video will produce horrendously large file sizes that will make it difficult or impossible for you to upload the files to us in a reasonable time frame! Make it easy on yourself... shoot in 1080p/60fps unless specifically asked to do otherwise***
**Note that for Safety, Orbit Videos can be broken into smaller clips.. no need to have one continuous video of the whole orbit.**
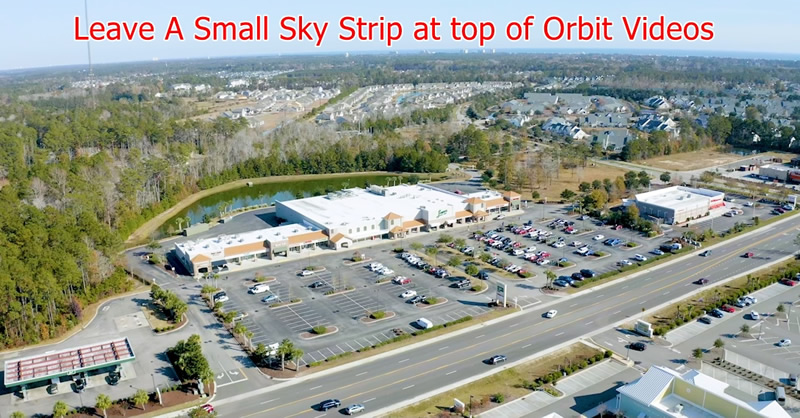
Orbit Videos should show a small Sky Strip at the top of the video, to ensure that Surrounding Retail and the general area will be visible in the distance.
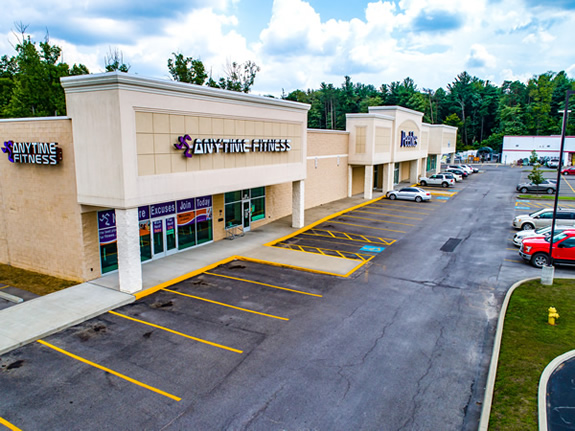
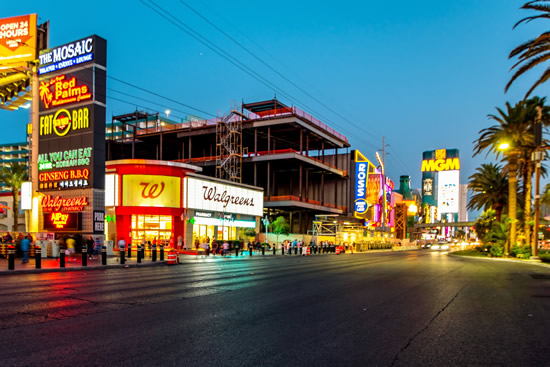
WIDE, LOW-LEVEL COMPREHENSIVE SHOTS...
Wide ground-level or low-level drone shots that show the whole property in one frame, building and parking lot, if it's a Retail or Industrial Site...
These wide ground/low-level aerial shots give the viewer a good overall idea of the whole property... instead of a few pieces of the puzzle, they see the whole puzzle put together in 1 picture. |
 |
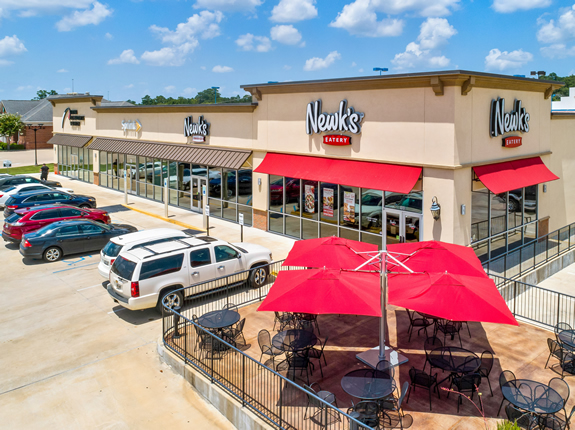
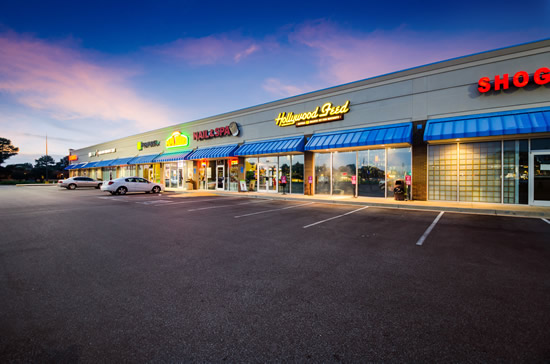
CLOSEUP LOW-LEVEL INSPECTION SHOTS...
Closeup Inspection Shots let the viewer see the building structure at a much more intimate location.. allowing for inspection of building construction, closeup viewing of building signage, etc.
For closeup aerial shots you would be at about 15 feet height, roughly about as high as the store signage on the face of the building.
For smaller buildings, the whole front face would be in the picture from corner to corner without being chopped off.
For Large Strip Malls, 2 or 3 smaller stores might be grouped together in 1 closeup picture. Because strip malls are so large, it's okay for the building to be chopped off on the left and right sides of the Closeup pictures of individual stores.
Good examples of Closeup Inspection Shots are Shots 28-31, and for smaller buildings possibly Shots 1, 2 and 8. |
 |
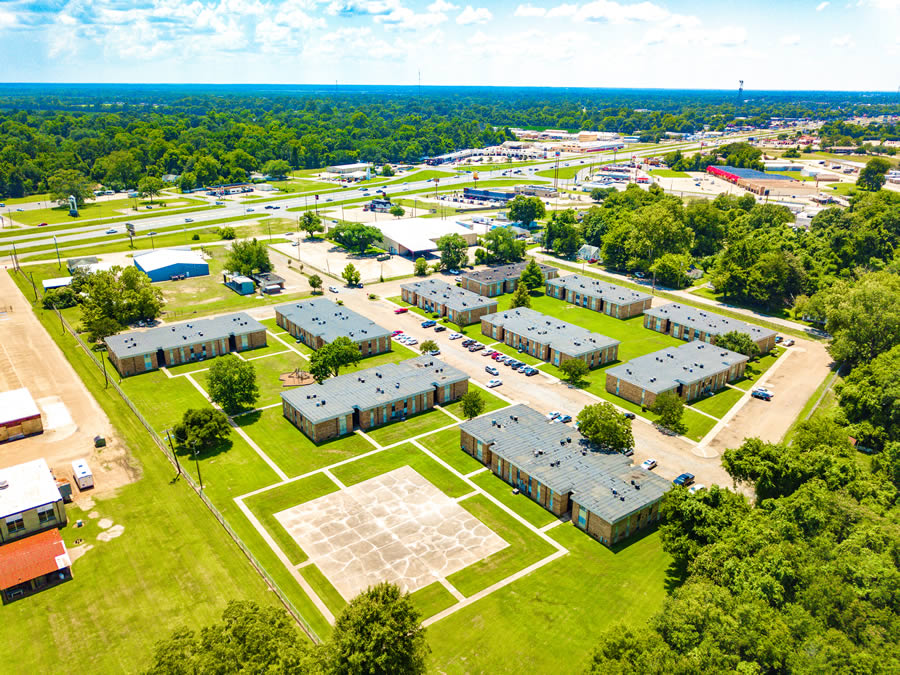
MID AND HIGH-LEVEL AREA SHOTS...
High-Level area shots showcase the Subject Property inset into its surroundings. However, for these high-level shots we are no longer inspecting the subject property, but are more interested in learning about the overall area in which the Subject Property is situated.
What else is around the Subject Property? Does the Subject Property have good street/highway access? What other businesses are near the Subject Property?
Seeing that the Subject Property is inset into an area that is a hotbed of retail activity can be very appealing to a potential buyer. |
 |
What's your "Cover Shot"?
 |
 |
When shooting a property, keep in mind that the Client will be looking for that "one good cover shot" (or "Money Shot" or "Hero Shot" as it's often called), that just sums up the whole overall property in one nice frontal shot. This might be a frontal ground shot, or a low aerial frontal shot, but whether ground or low aerial it is usually some type of wide frontal shot that basically just tells the "story" of the overall whole property in one picture, and it's one that they can put on the front cover of an Offering Memorandum pamphlet, or for any other purpose where they need a "Cover Shot".
One of the standard shots on our Shot Lists may cover this angle depending on the property layout, or it may be a freestyle shot that you choose based on your own liking. Either way, having at least one good "cover shot" is a very important part of every job!
Don't Cramp the Building in Too Closely!
 |
|
| DON'T DO THIS... | INSTEAD DO THIS |
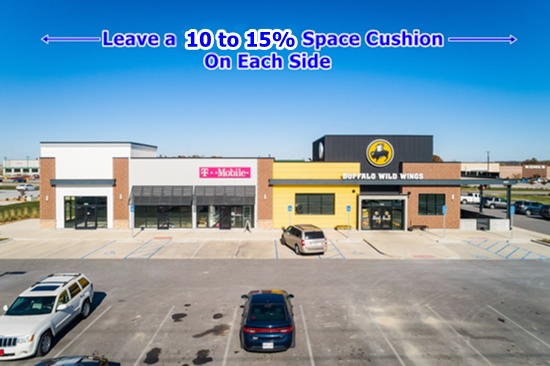
Leave Some Space Cushion!
One of the *biggest* complaints we get from Clients is that the photos are taken so close to the building that there's barely any space on the left and right sides of the photos -- or that the edges of the building are chopped off. Leave a "space gap" of about 10% to 15% (even more is fine) on the left and right edges of the photo, so the building isn't jammed right up against the edges of the picture.
 |
 |
JUST TAKE THE SHOT ANYWAY
It's much easier to just take the shots that the Shot List calls for, than to write a 1000-word essay on "Why I Skipped Shot 6." A picture really is worth 1000 words, so if the area the shot calls for is junky, in disrepair, or obstructed by objects or vegetation, just take the shot anyway. The picture will explain for itself why it wasn't a very useful shot, but it will also prove to the Client that we were thorough in our work, and that we aren't just digging for excuses because we forgot to take shots called for on the list. Ultimately, the Client can make the choice on whether to use it or not at their discretion.
If you're appoached by anyone on site.. whether it's property management, tenants, customers, curious bystanders, etc.. if they ask why you're taking photos, simply tell them you're hired on behalf of the Property Owner to take the pictures, and you're not sure exactly how they will be using them. Please *do not* go into conversation speculating as to whether the property is for sale, whether the photos will be used for marketing purposes, etc., simply say you're hired through a photography company on behalf of the owner. Giving any other information about the purposes of the photos can get you into hot water with the property owner! So just keep it simple, tell them you're hired to take photos on behalf of the owner, and leave it there. If they press you for further information then have them call Johnnie at 318-613-1837 and we will take care of it for you. Site personnel are usually very cooperative with us and our work, but if not you can always feel free to leave the site, and we will inform the Property Owner of the issue with the employees. Oftentimes a single property owner will own multiple properties, even across multiple states, and the local employees might not be made aware of the photo shoot ahead of time.
****MAKE IT COMPLETE, BUT SHORT AND SWEET!!****
Take all the pictures you want! But please cull them down to the best ones before uploading!
We need to take all the angles called for on the Shot List, and a few more angles you find while on site can be nice too, we appreciate your being thorough...
But please... keep it easy on yourself AND us by not uploading horrendously large amounts of pictures. Please take the time to go through your pictures, pick out the best ones as called for on the Shot List and cull the numbers down to the appropriate photo counts shown before before uploading:
RECOMMENDED PHOTO UPLOAD COUNT
SMALL RETAIL SITE ABOUT 3 ACRES OR LESS: About 30-45 Pictures
MID-SIZE RETAIL STRIP MALL ABOUT 3 TO 6 ACRES: About 40-60 Pictures
APARTMENT COMPLEX, NO INTERIOR SHOTS: About 50-70 Pictures
APARTMENT COMPLEX, WITH INTERIOR SHOTS: About 60-90 Pictures
LARGE RETAIL STRIP MALL COMPLEX 6 ACRES OR ABOVE: About 80-100 Pictures
Remember... it won't matter if you over-deliver with 100 extra (unnecessary) pictures, if you don't even cover the basic angles needed on the Shot List!
Avoid reshoots... make sure you properly cover all the basics first on the Shot List.. then, if you want to include extra shots (not required), that's great also!
Viewing RAW Files
If you don't have a quick and efficient way to look through RAW files and cull them down to the best ones, we use and highly recommend FastRawViewer, which you can download at:
ARE YOU DOING BRACKETED (HDR) SHOTS?
NO MORE THAN THREE (3) SHOTS PER POSITION PLEASE**
IF YOU ARE BRACKETING YOU MAY DELIVER UP TO 150 PHOTOS PER JOB
BRACKETING SHOULD ONLY BE DONE ON INTERIOR, GOLDEN HOUR & TWILIGHT PHOTO JOBS..
DON'T BRACKET DAYLIGHT, MIDDAY OUTDOOR PICTURES PLEASE
To keep things simple, Bracketed (HDR) Shots are *not* required on any job. They can be helpful to us at times, especially on Interior or twilight pictures but again not required. However.. if you *do* decide to take Bracketed shots.. *please* limited the number of bracketed shots to 3 shots per position. Uploading more than 3 brackets per picture can lead to horrendously long upload/download times.
**DO NOT** UPLOAD MORE THAN 150 PHOTOS PER JOB FOR ANY REASON, INCLUDING ALL BRACKETED PHOTOS
If you upload more than 200 Photos -- including any Bracketed photos you may have taken -- we will not accept the Photo package. Please follow the Guidelines above for Maximum Photo Count based on the type of site you are shooting, and if you are also delivering Bracketed shots, please at least try to keep the total photo count to 150 pictures or less. If you're not doing bracket shots, your upload size should almost always be 125 photos or less even for the largest jobs.
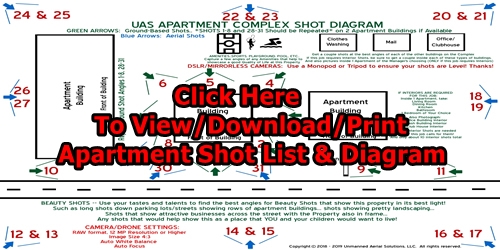
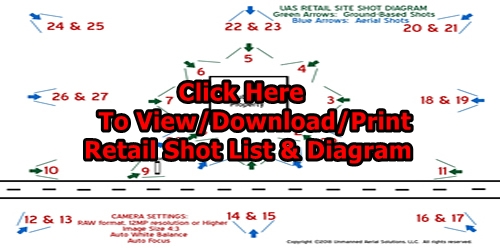
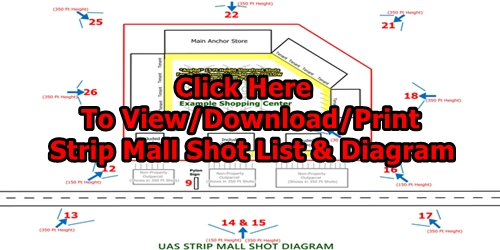
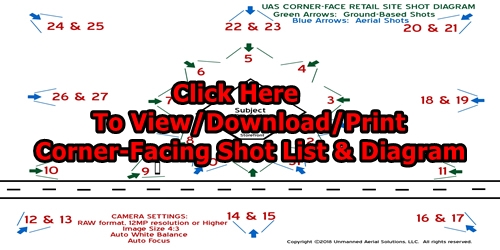
Click an Image below to Download the Shot Checklist and Shot Diagram for your particular type of Job:
| APARTMENT COMPLEX SHOT LIST & SHOT DIAGRAM | RETAIL SITE SHOT LIST & SHOT DIAGRAM |
 |
 |
| STRIP MALL SHOT LIST & SHOT DIAGRAM | CORNER-FACING SHOT LIST & SHOT DIAGRAM |
 |
 |
SPECIAL CONSIDERATIONS FORLARGER "STRIP MALL" PROPERTIES 3 ACRES AND OVER:
Larger Strip-Mall properties require a few more pictures, and a little more time and work (and therefore these types of jobs pay more). But they're still relatively easy if you plan them right and follow the guidelines here.
For larger Strip Mall properties about 3 acres or larger, please *skip* the ground-based Rear Loading Area shots, such as Shots 4,5, and 6. On these larger jobs, there's plenty that has to be shot out front so this simplifies the job; sometimes these 'backalley' areas can be unsafe.. and quite often the clients won't use those rear-area ground shots anyway. So keep things simpler and safer by skipping Ground-Based Back Alley Shots 4-6 on these larger strip malls.
But please *Do Not* skip the Rear and Side Area AERIAL shots,
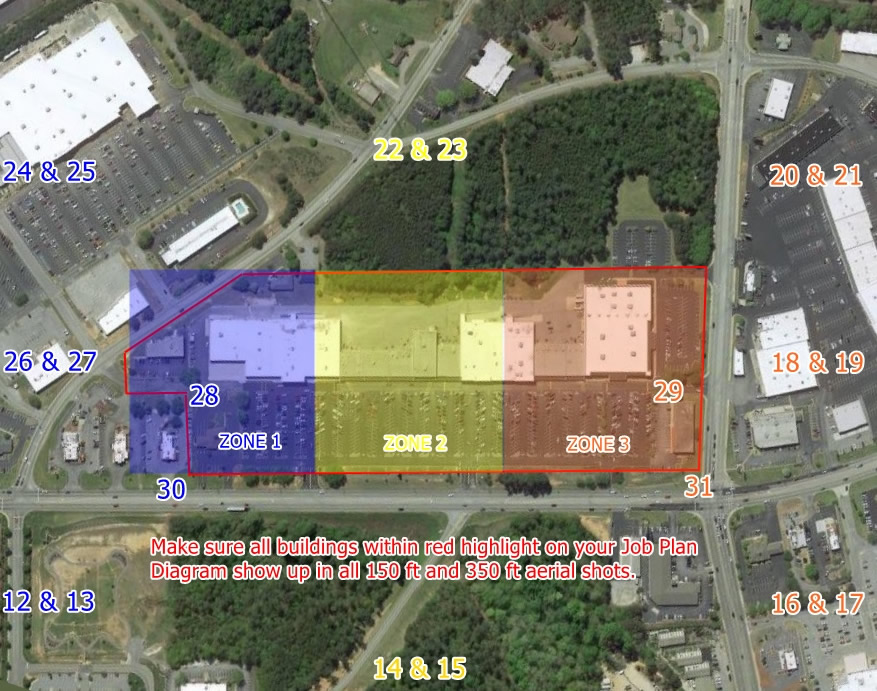
Helpful Hint: Divide large "Strip Mall" properties into 3 "Zones"
On larger Strip Mall properties, make things easier on yourself by dividing the job site up into 2 or 3 "zones", and work on 1 zone at a time, getting all the ground and aerial angles from the Shot List for that area while in that one zone. It'll require you to skip around a bit on the Shot List (for example on the picture below in "Zone 1" you would get Shots 24-28 and Shot 30), but this will keep you close to your Drone to help ensure you always have good "line of sight" with it, and are always close to it if you need to land because of low battery, etc.
If you print the Shot List and check off the boxes as you go, it'll be easy to work within smaller "Zones" and not have to worry about forgetting shots from the list as you move through the zones.
Important: Frontal Examples for Strip Mall Properties
On Strip Mall Properties, the "ground" shots should be taken with the Drone (not the DSLR) so you're able to get just above the cars, so they don't block the view of the storefront faces. Position the drone somewhere at the rear of the parking lot (or even across the street if necessary), somewhere far enough back to get the whole Strip Center from left to right side in frame if possible. The drone should be at about 15 feet height to get a good Low-Level view of the Building Face above the cars, raise higher if necessary. If the Strip building is too long to get the whole building in frame at a low height, then take a photo of each section as wide as possible.
For Large Strip Mall properties, don't forget the Individual Store Angled Close-Up Shots
Large Strip Mall properties pay handsomely! But of course they do need extra shots to cover everything.
For Large Strip Mall properties... In addition to the normal shots on the Strip Mall Shot Checklist, we must take Closeup Shots for each Store Tenant at the property. For each store at the site, there should be either 1 Ground-Based Angled Closeup shot (IF there are no cars parked in front blocking the front face), OR if cars are parked right in front of the building, a 15 foot height Aerial Angled Drone Shot to get above cars blocking the front face view of the store. Repeat these shots for every Store Tenant at the property. But... make it easy on yourself... for smaller stores it's ok to group 2 or 3 together at a time in a single shot.
Since you can take these angled shots from either the left or right side of the store... we recommend taking the shot on the side of the store looking away from the sun if that's an option, to avoid sun glare straight into the camera.
Keep it Easy and Safe! For larger Strip Malls of about 5 acres are larger, you can **skip** the ground-based rear "back alley" shots (Like Shots 4-6 on the Retail Shot List). The Clients don't usually need those shots on large strip malls, and those areas will already be visible in the normal aerial shots behind the strip mall. Plus those rear areas can be unsafe for walking around, due to large numbers of trucks unloading.
Is your Strip Mall Job Photo Count Too Light?
For Large Strip Mall properties 5 acres or larger, you should probably end up with around 40 or more photos, give or take. If your job calls for video, that would be extra beyond the 50 or so still photos. Super-Large strip malls of over 10 acres will likely end up with around 50 still photos or more, give or take. This is because of the extra number of closeup ground and drone shots for each store.
|
AVOID RESHOOTS!
DON'T MISS ANY CRITICAL SHOTS: PRINT the Shot List & Shot List Diagram and check the Shot Numbers off as you obtain imagery on site!!
Remember that the Shot List is not only the secret to letting you move around the property quickly without having to think about what to shoot next..
It's also the Job Blueprint that helps avoid having to return for a reshoot!
Study it BEFORE you arrive onsite.. USE it for efficiency and accuracy once you're onsite!
No Home Building Contractor would operate without a Blueprint! It's the set of guidelines that ensures the job is being done to Specification and it protects both parties... and your Shot List and the specifications detailed here are your "blueprint" as a photographer for this job site. You may not be a Building Contractor, but as an Independent Contractor of a different profession, the type of work is different but the principle is the same!
SHOTS CAN BE TAKEN IN ANY ORDER YOU CHOOSE... THEY ARE ONLY NUMBERED TO GIVE A DESCRIPTION OF EACH SHOT
Pay SPECIAL attention to Shot Numbers Labeled "CRITICAL SHOTS" on this Page! While we can afford to miss a couple shots here or there, any Shot Number that is labeled as "Critical" is one of the most important angles for the WHOLE shoot! Make every effort to get the Critical shots, unless there is a safety or legality issue that prevents it!
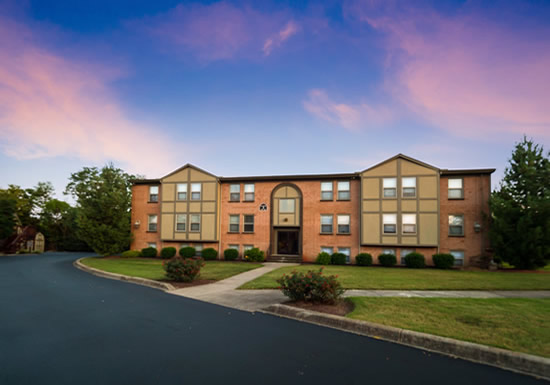
Just as important as getting all the right angles, is getting the right framing for your images. Below are some photos that showcase the way that you should frame up the imagery you are taking. Whether you are shooting a Retail Property or an Apartment Complex property, the angles will be the same...
SHOT #8
This is Shot #8 from the Shot List... it is always facing the front-left corner of the property. You can see the left-rear corner, and the right-front corner as well. You can see sky above the roof, and ground below the front-left corner. In other words, none of the mentioned corners have been chopped off, and the building fills about 80% of the frame. There is always a little space left at the top, right, bottom and left of the building. Of course, if there are obstructions blocking you from getting this perfect shot, move left/right/backward/forward as you see fit, to get the best shot possible from this angle. Shots #2, #4, and #6 are framed in this same way, taken from those specific corners.
SHOT #1
**CRITICAL SHOT**
This is Shot #1 from the Shot List... it is always facing the front of the property and is one of the most important shots you will get. You can see the left corner, and the right corner as well. You can see sky above the roof, and ground below the building. In other words, none of the mentioned corners have been chopped off, and the building fills about 80% of the frame. There is always a little space left at the top, right, bottom and left of the building. Of course, if there are obstructions blocking you from getting this perfect shot, move left/right/backward/forward as you see fit, to get the best shot possible from this angle. Shots #3, #5 and #7 are framed in this same way, taken from those specific sides.
Note: On Larger Properties, especially large/wide Strip Mall retail properties, instead of taking the shot from the ground, Shot 1 may be taken with the Drone at 10-15 feet height, if it helps to get above cars/trees in the Parking Lot so that the Building Face may be seen better.
 |
 |
|
SHOT 9 |
ANOTHER OPTION FOR SHOT 9 |
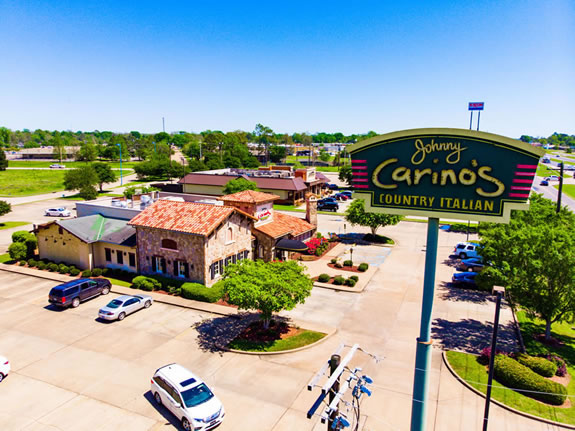
SHOT #9 PYLON SIGN
**CRITICAL SHOT**
Whether you take Shot #9 from the ground, air or both.. the whole Pylon Sign should be in the frame (not chopped off), and at least part of the Subject Property should be included in the frame. If you have to chop off some of the Subject Property to get the whole Pylon Sign in the frame, at least try to get the whole front face of the Subject Property in the frame if you can.
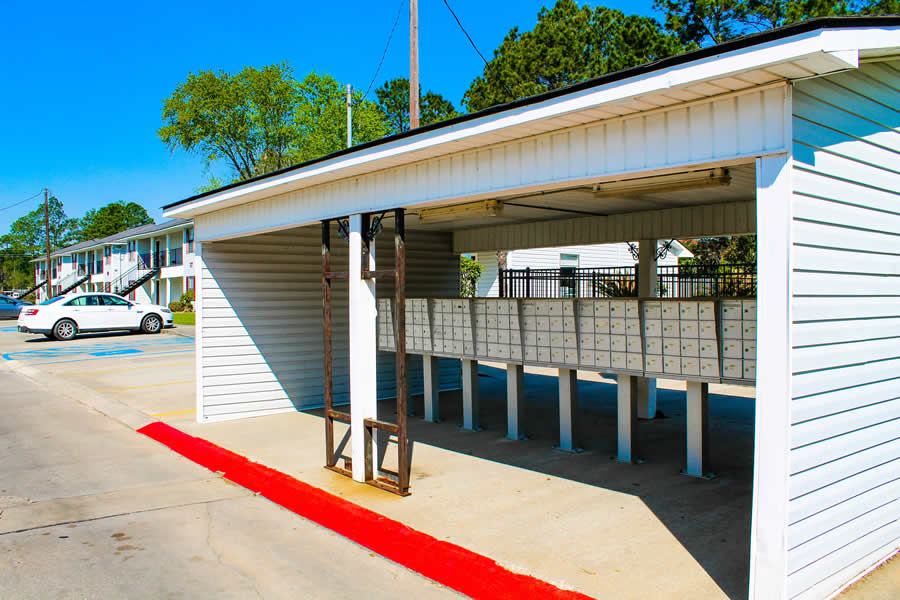
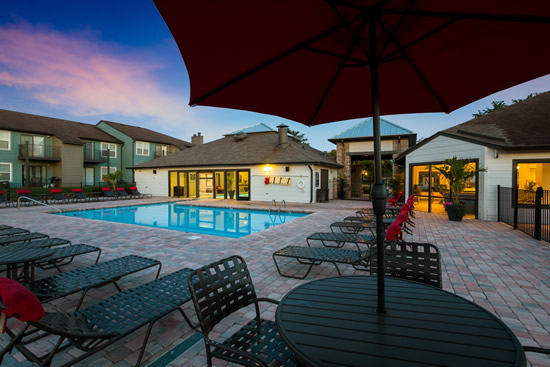
BEAUTY SHOTS OF FACILITIES/AMENITIES
Capture freestyle shots of any facilities and/or amenities on the property... mailboxes, washrooms or washroom buildings, pools, tennis courts, basketball courts, playgrounds, etc. Frame these subjects however you think shows them at their best.
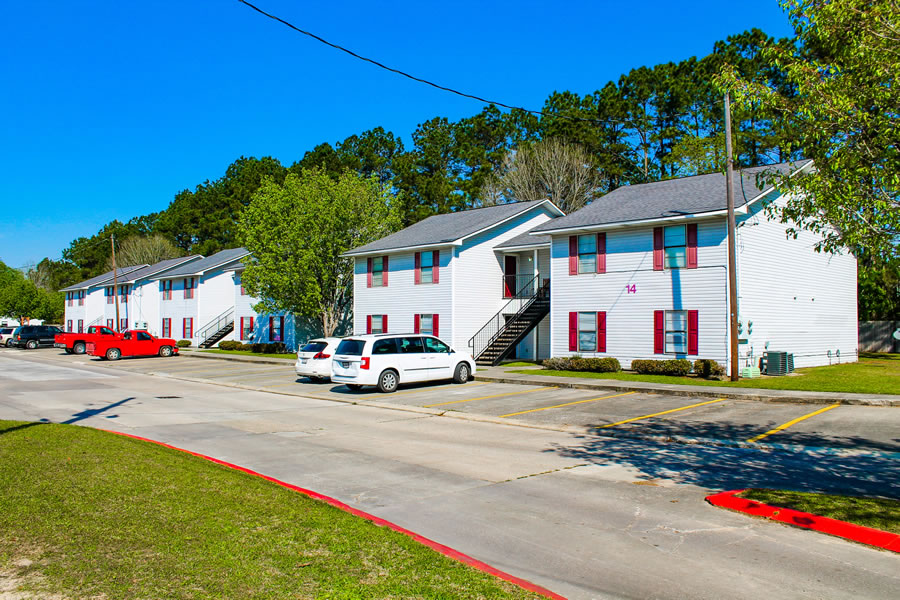
OTHER BEAUTY SHOTS
Beauty Shots are your chance to show your creativity through capturing freestyle imagery that makes this property look its best. If its a large property, that might mean capturing photos such as this one that contain a view of multiple buildings to create a sense of a good neighborhood. Other Beauty Shots might showcase pretty landscaping on the property with the buildings in the background.
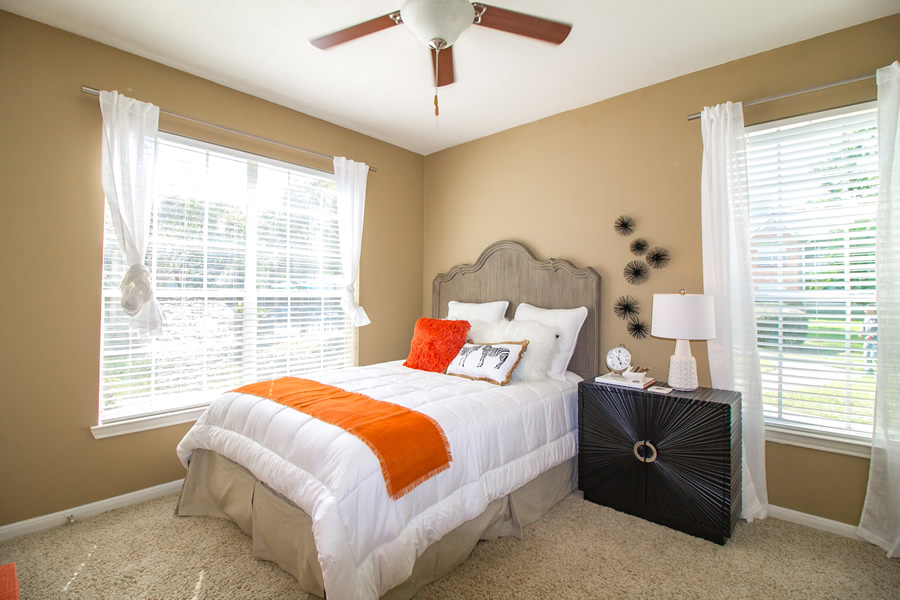
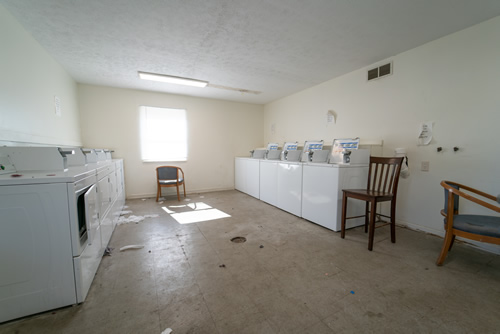
INTERIOR SHOTS
Interior Shots don't need to be a complicated thing on most jobs. In fact, most jobs won't even require Interiors, but be sure to check your job details to see if they apply to a job you're given, so you can avoid having to make a trip back to the property to get them. Again, they don't have to be anything complicated or time consuming. Use your tripod or monopod to help avoid camera movement that can lead to blurring due to the darker conditions inside. Set the tripod or monopod at about 3 or 4 feet height. Camera settings are the same as outdoor shots, RAW Format, 4:3 image size, Auto White Balance, Auto Focus.
Although not a requirement, it is very helpful to use a semi-wide angle lens such as the Canon EF-S 10-18mm f/4.5 - 5.6 lens (only about $279 at time of this writing), as was used in the picture above. If you don't have something similar, this is a good item to put on your "wish list" for interior photography jobs. In fact a 10-18mm lens is PERFECT in our opinion for OUTDOOR commercial real estate work too, that extra bit of wide angle really helps to capture whole buildings without chopping them in the photos.
Often times, setting the camera in the far corner of a room and then shooting wide across the room will give the most detail possible, especially in smaller rooms or smaller apartments. Open curtains and blinds to get the most natural lighting into the room that's possible, and also turn on all artificial lighting. If there are still dark spots, a simple and inexpensive fix can be to use a 2nd tripod and attach a simple shop light with a soft white bulb facing upwards (soft white LED bulbs work great), to wash the walls and ceiling with light. You can set the 2nd tripod somewhere outside of the frame so it doesn't show in the picture.
Two of the biggest problems we see with Interior photos are grainy shots often due to the camera selecting a super-high ISO setting (like 1600 or 3200), and out-of-focus shots due to the camera's inability to get a good automatic focus in dark environments...
Want Better Interior Photos?
Consider an inexpensive 10-18mm lens(as the one mentioned above) for your DSLR camera...
Shoot from the farthest you can back into the corner of a room for the widest view...
Shoot in Aperture Priority mode and set Aperture between F/8 and F/16 for a deeper Field of View, to avoid focusing just on items in the close foreground area....
Set your camera to limit maximum ISO to no more than 800 to avoid grainy indoor photos...
And practice using Manual Focus on your camera, because the Auto Focus has difficulty in dark environments.
The camera's View Finder will often give a more razor-sharp view to check focus. Don't use that gimmicky LCD screen to check focus... it's great for navigating menus but it has nowhere near the image resolution of the human eye throught the camera's Viewfinder!!
Tripods (or even just a $20 Monopod as was used on the above photo) are great too for helping to keep indoor imagery sharp!
Here's a GREAT article that reveals many of the "magic camera settings" for getting great Interior shots.. it's not as complicated as you might think:
 |
 |
|
SHOT 28 Captures Front Face and Left Building Corner in Frame Roughly about as high as the Store Signage on the Face of the Building |
SHOT 29 Captures Front Face and Right Building Corner in Frame Roughly about as high as the Store Signage on the Face of the Building |
|
 |
 |
|
| Another Shot 28 Example... Notice how CLOSE you need to be to the building? 20-40 feet away from the corner, and about 15 feet above ground but not higher than roof level, so we avoid seeing items on top of the roof. The result is a GREAT Low-Level shot that helps sell properties. |
Another Shot 29 Example... CLOSE (about 20-40 feet away) to the Right-Front Corner and only about 15 feet above ground, or roughly about as high as the Store Signage on the Face of the Building. There's a REASON they call these Low-Level Closeups!! |
|
 |
 |
|
Apartment Building Shot 28 Example
Again at about 15 feet height, high enough to clear cars but still low enough to show a nice, CLOSE UP frontal shot of the Building Face. |
Apartment Building Shot 29 Example
Again at about 15 feet height, high enough to clear cars but still low enough to show a nice, CLOSE UP frontal shot of the Building Face.
|
|
AERIAL SHOT #28 AND #29
AERIAL CLOSEUPS
**CRITICAL SHOTS**
Around 15 feet above ground but *Not* above Roof Line in most cases
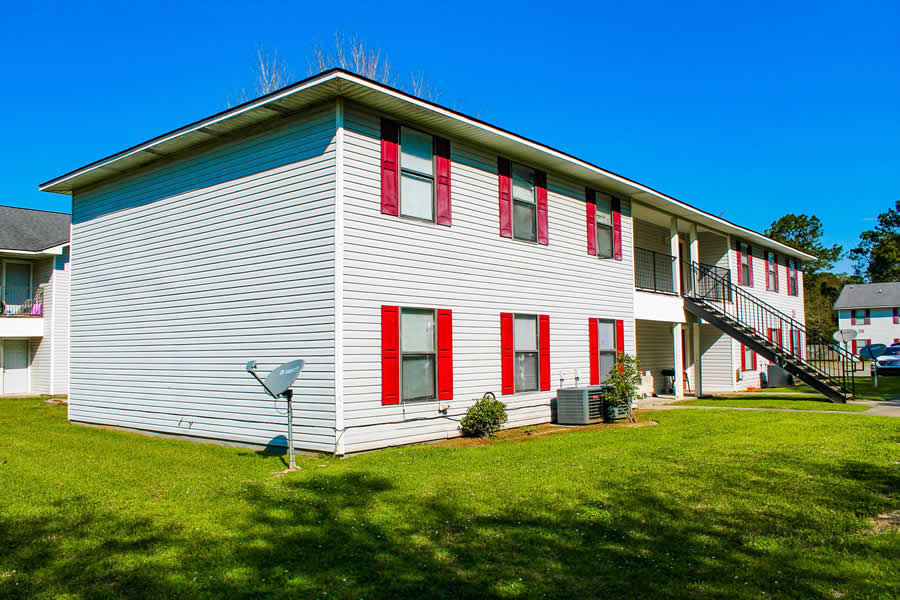
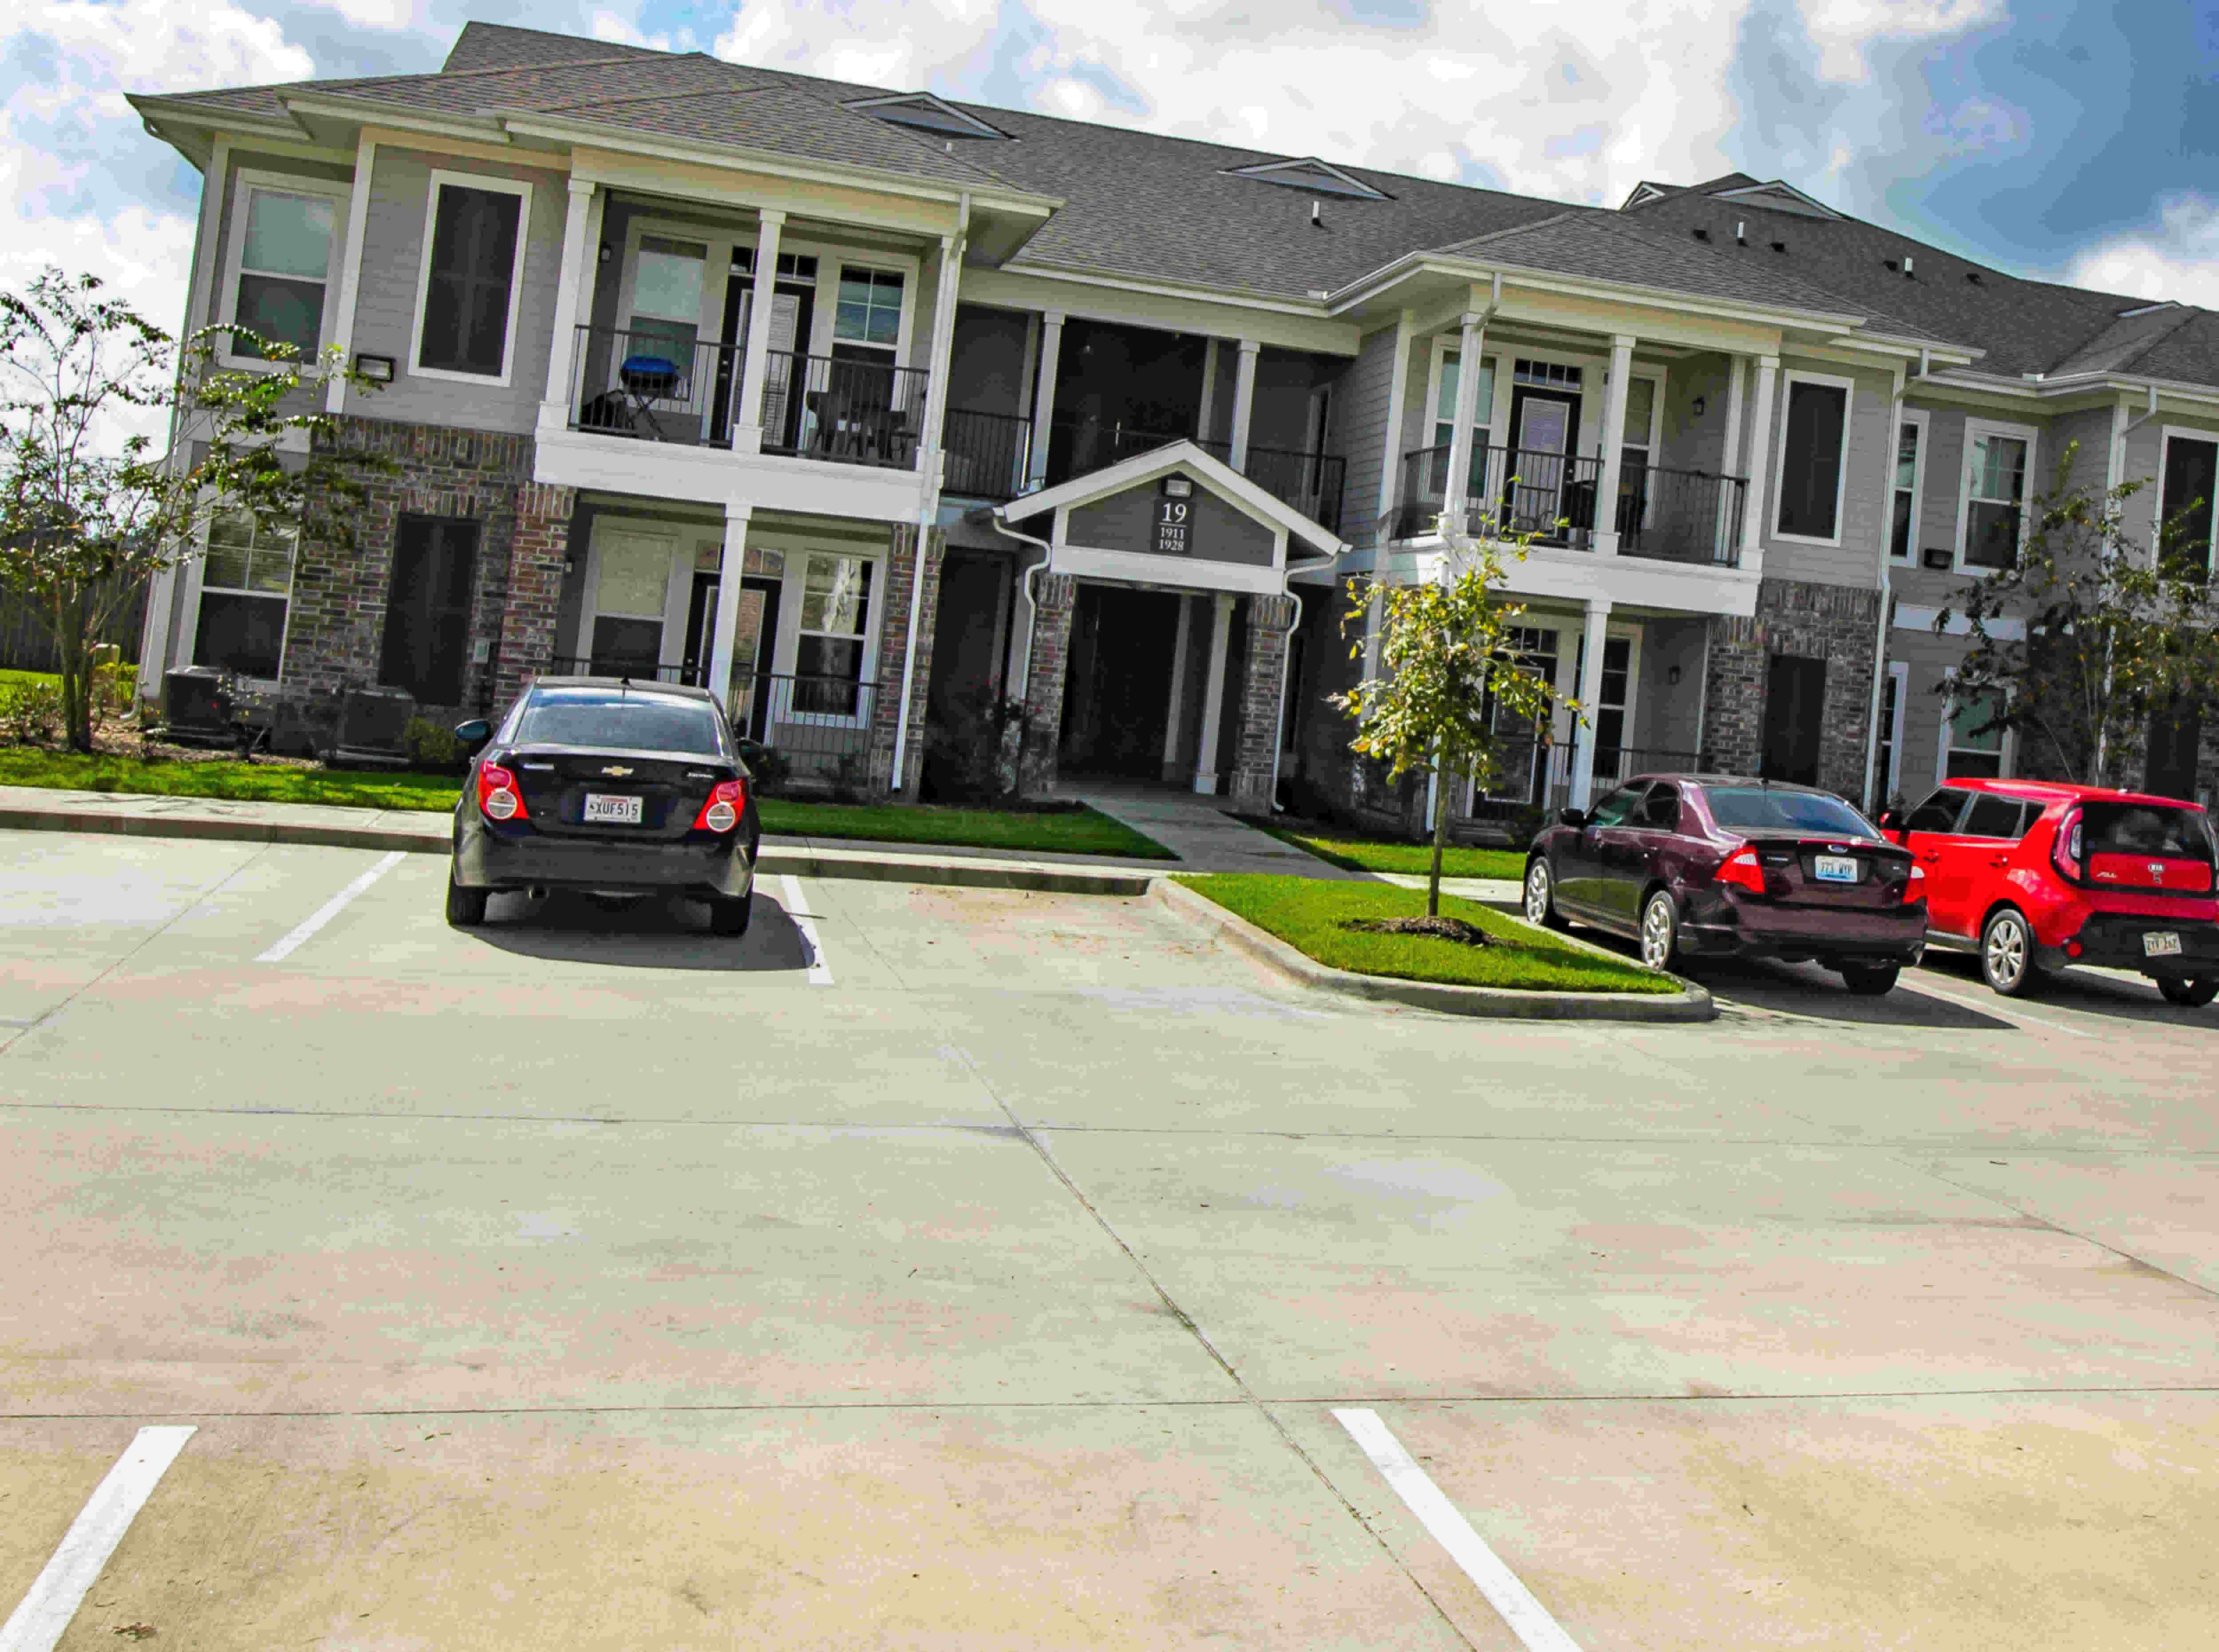
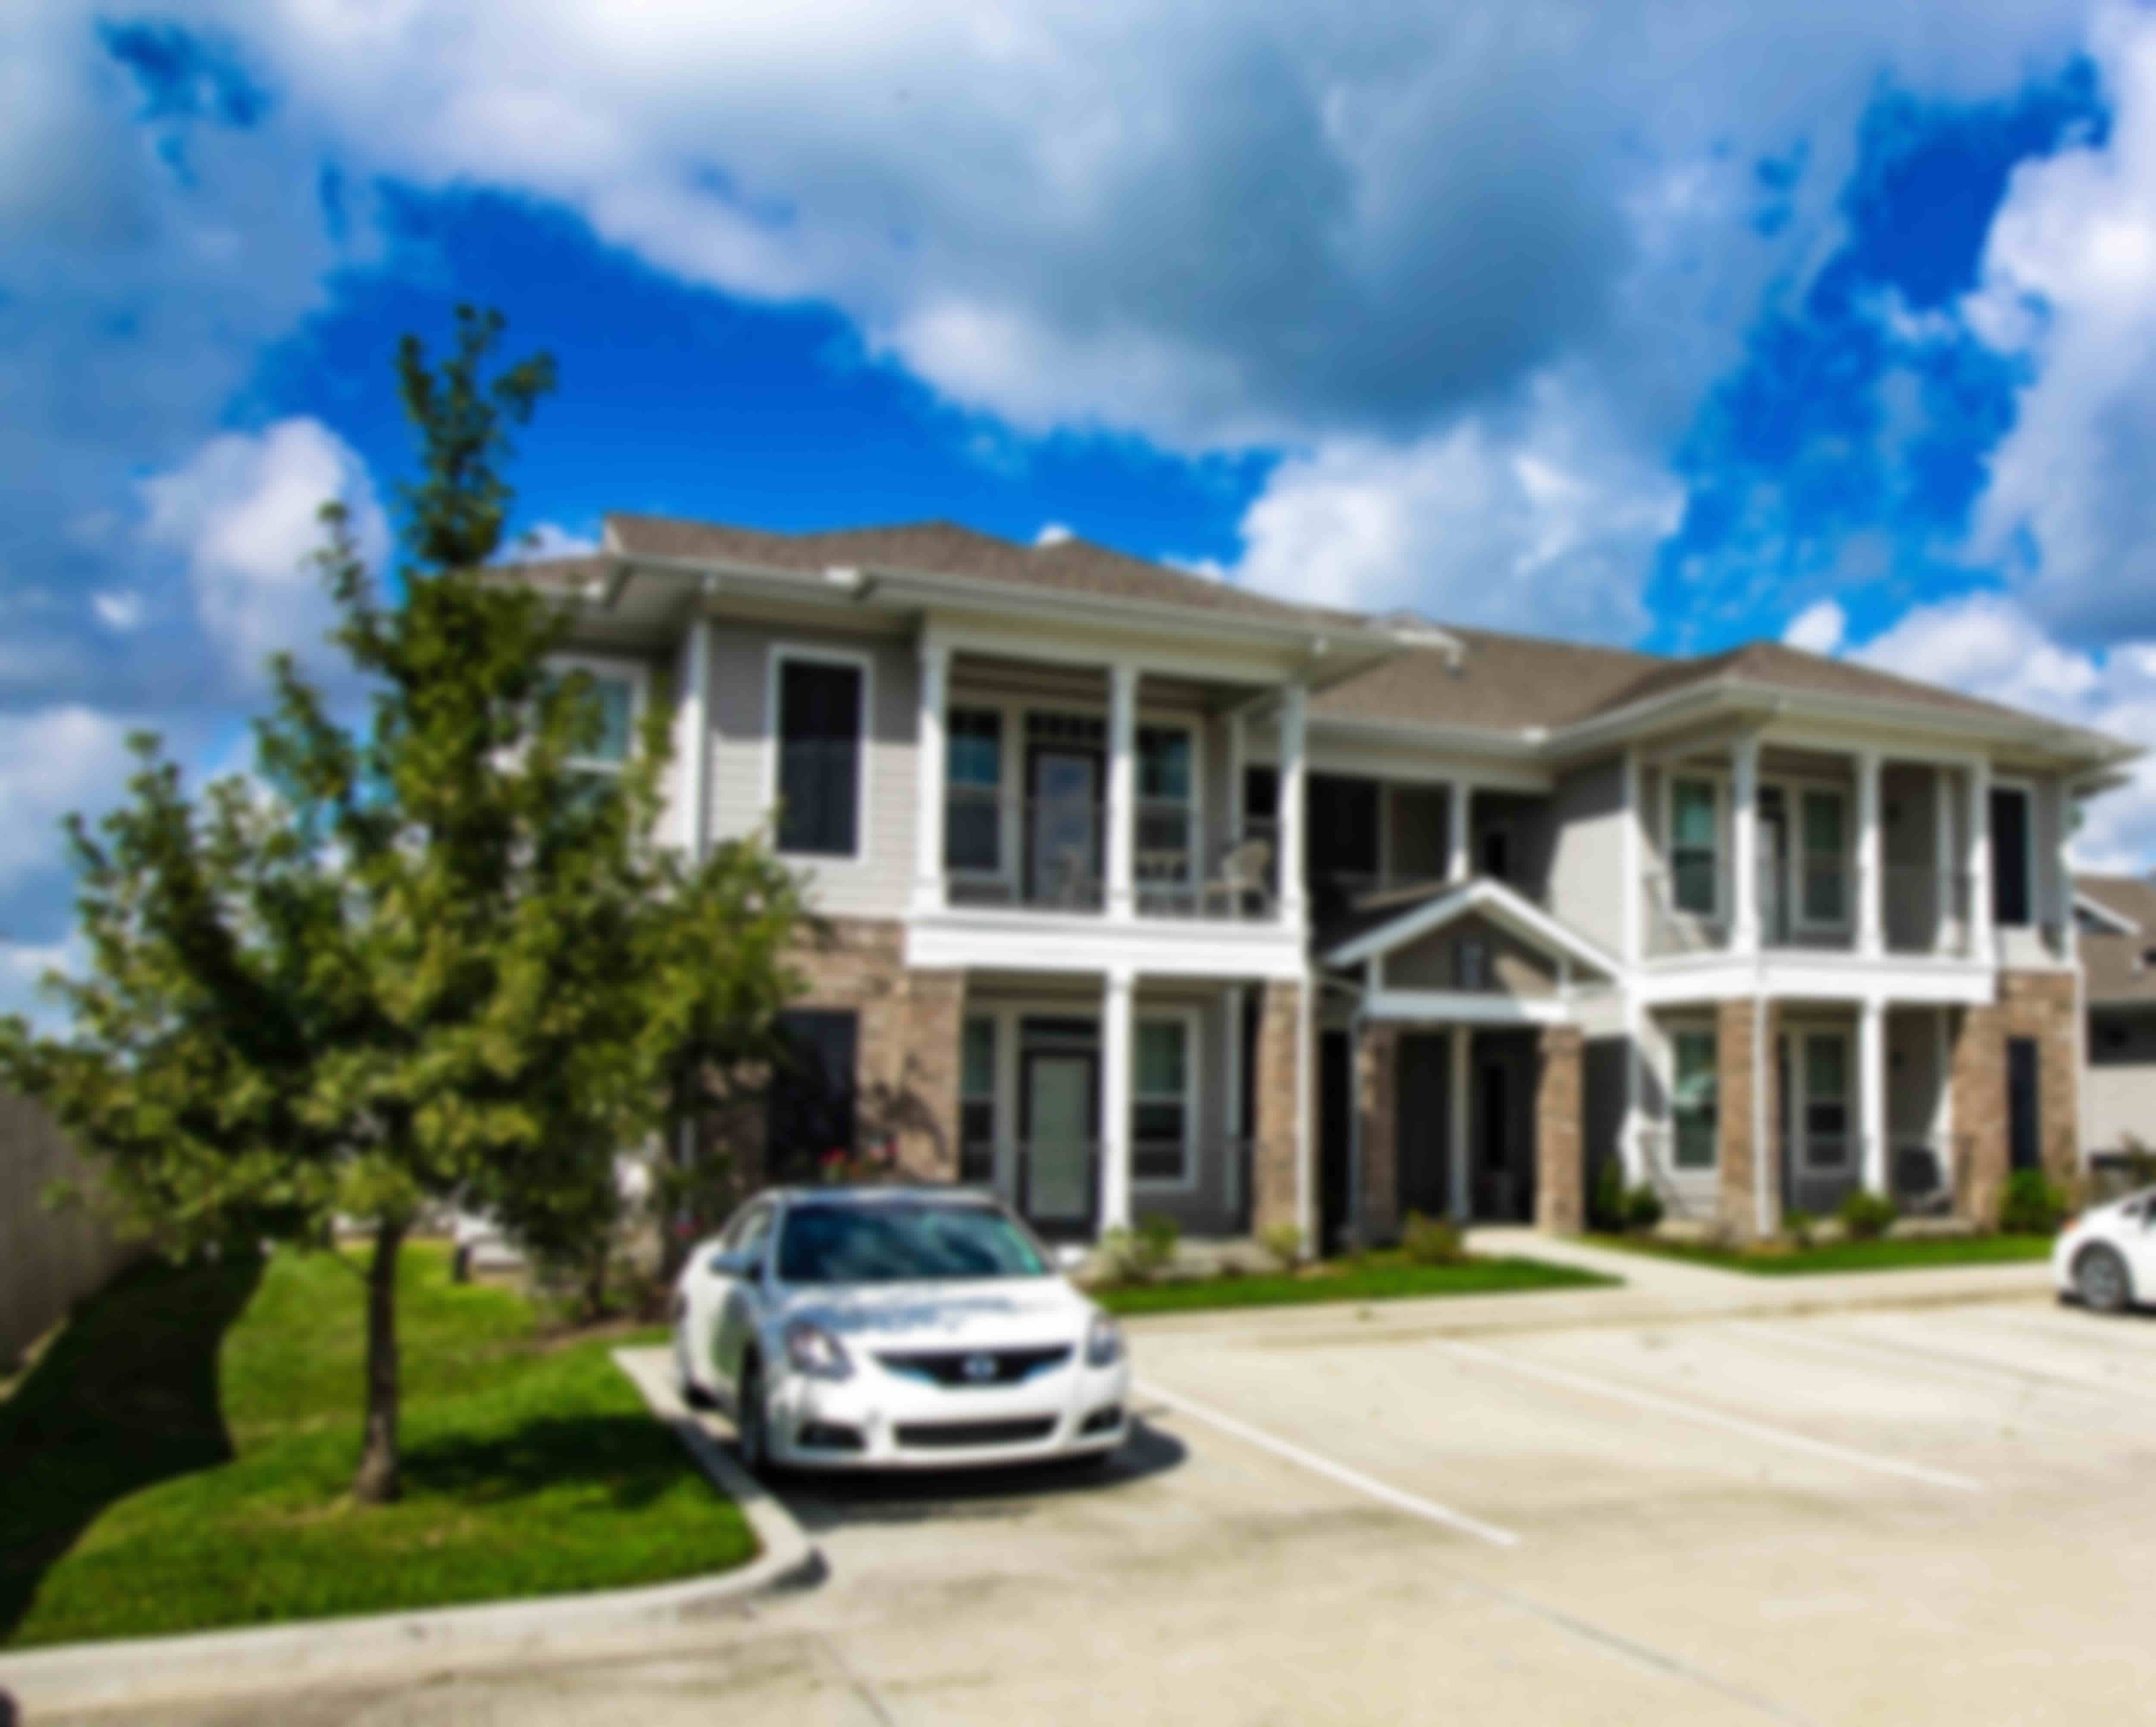
As you can tell, these are some of the most beautiful angles to image a property from when it is done right. The point of interest on these shots is the FRONT face of the building. Closeups mean CLOSE to the building! The drone is positioned at about 15 feet height above ground, at about a 45-degree angle off the corner of the building, only about 30 feet or so away from the nearest corner of the building. The whole front face of the building is near the center of the image, with some of the front parking lot also showing. For smaller properties, the whole building can be included in this shot. For larger properties, the subject should be the Front Face of the property, with the nearest corner also included in the shot. Shot #28 and #29 are identical except #28 is taken from the left-front corner of the building, and #29 is taken from the right-front corner of the building (see the above images and the Shot Diagram for exact position).
 |
 |
|
SHOT 30 -- FRONTAL LEFT OFFSET |
SHOT 31 -- FRONTAL RIGHT OFFSET |
AERIAL SHOT #30 AND #31
FRONTAL OFFSET SHOTS
**CRITICAL SHOTS**
These shots are also taken at about 15 feet height, but they are farther back in the parking lot, about as far back as where you took Shot #1. Like Shot #1, they feature the Front Face of the Property, but these are taken aerially at about 15 feet above ground, are offset from center, and will show just a shave of the side of the building. Shot #30 is offset from center toward the Left Side of the building (as shown in this picture), while Shot #31 is offset from center toward the Right Side of the building.
HIGH-LEVEL (350 FT) AERIALS FRAMING
Make it easy on yourself! For 350-foot high-level aerials, stay close to the Subject Property, and just keep the whole property centered in the bottom half of the frame. There's no need to back farther away from the subject property... it eats time, wastes your batteries, and puts you farther from your drone making it tough to keep good line-of-sight with it. Centering the building and immediate surrounding parking lot in the bottom half of the frame helps you avoid this.
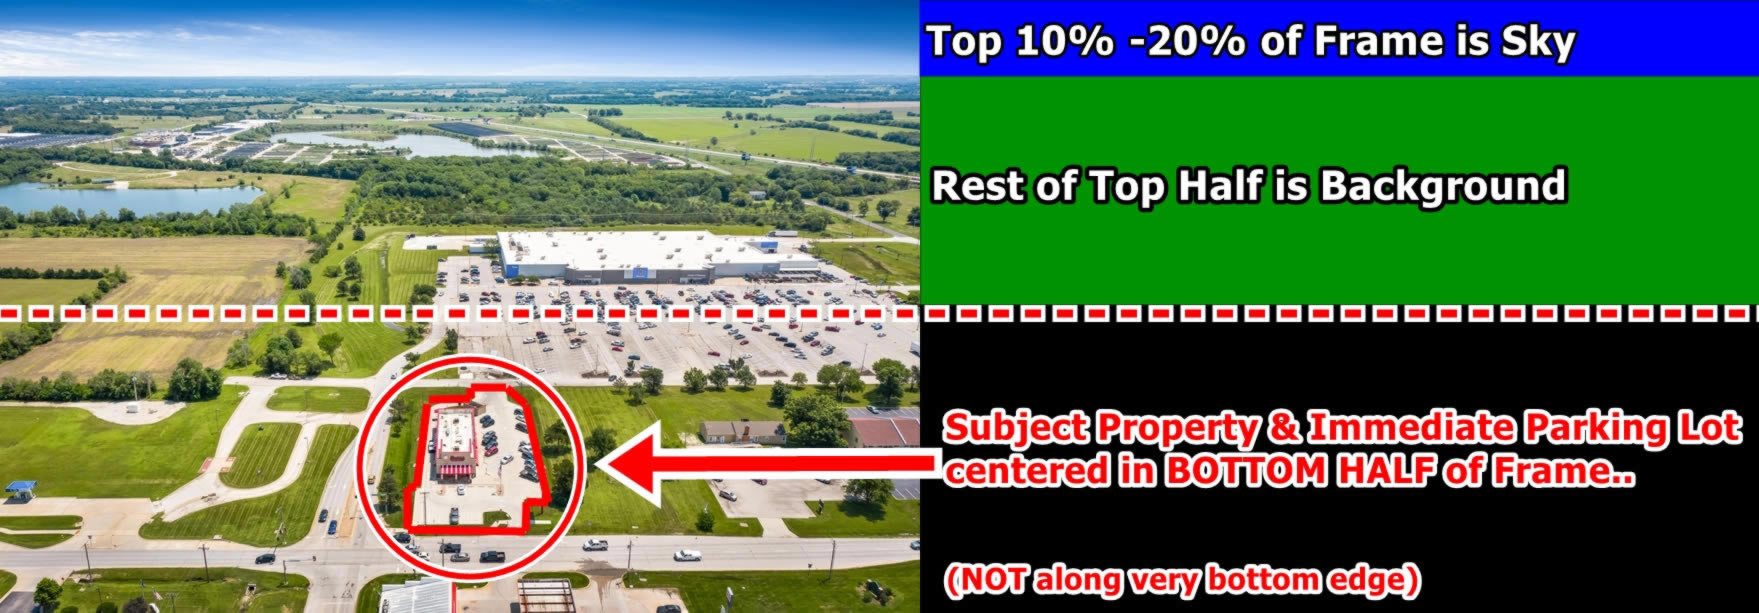
Just start climbing near the Subject property until you reach 350 feet height, pitch camera up/down until you leave the small Sky Strip at top of frame.. then back away **just** enough that the whole building and the immediate surrounding parking lot is centered in the bottom half of the frame (NOT barely hanging on the very bottom edge). This method makes sure the whole subject property is included in the picture, but keeps you from having to back too far away, avoiding using up all of your batteries and losing line of sight with your drone.
Remember -- Only about 10-20% Sky Strip at the Top of the 350 Foot Aerials!
Definitely no more than 20% Sky Strip for 350 foot aerials
AERIAL SHOT #21
With Aerial Shots, the Subject property might fill anywhere from 20% to 80% of the frame from left to right, depending upon what the Pilot thinks will allow the property to look its best. Small Retail buildings might fill a smaller amount of the frame, while large Apartment Complexes will probably fill a large portion of the frame.
To add perspective and to show the location of surrounding retail, on 150 foot height and 350 foot height shots there should always be a thin strip of sky at the top of the frame, this "sky strip" should fill about 10% to 15% of the top of the picture but no more than about 20% sky strip at the top of the picture.
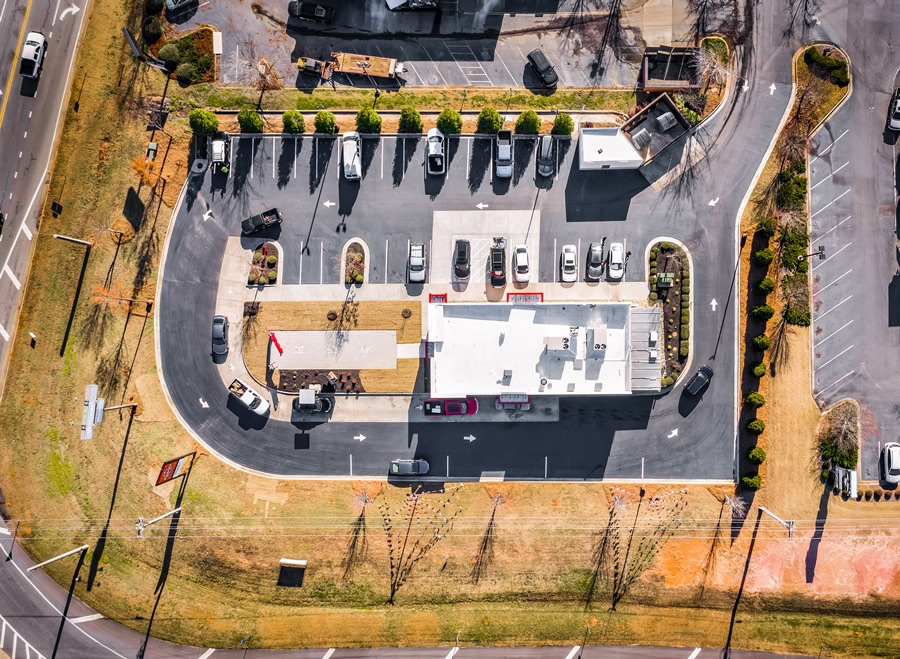
AERIAL SHOT #32 ("BIRD'S EYE")
For Properties 2 Acres or smaller only
A top-down "bird's eye" shot taken from 350 feet height, showing the building and immediate parking lot area. Note this shot is only needed if the property is about 2 acres or smaller... larger properties are typically too big to get the whole site in view without chopping it off.
 |
 |
 |
 |
TWILIGHT SHOTS
Twilight Shots don't have to be overly technical, but a basic Tripod is a must to avoid "smearing" in the imagery. Setting up your camera to do Bracketed (Also known as HDR) Shots helps tremendously also. Most modern DSLR cameras can be set up to do Brackets, which takes repeat shots at different Exposure levels. Even just 3 exposure levels (Brackets), when we combine them in post processing, can make a beautiful twilight image, especially when we add twilight sky replacement. So a Tripod, and learning to set your camera for Bracket (HDR) shots, are the 2 things that go the farthest toward successful twilight photos.
• A Tripod is a MUST for Dusk/Night Imagery to avoid Blurring that will make your photos useless!!
At minimum, purchase a basic tripod from Amazon, Best Buy, etc. for $20-$30.
• A Wide Angle Lens for your DSLR, 10-18mm or similar, is not a necessity but can be bought for around $250 and will be a GREAT help to not only your Night Photography but ALL of your Real Estate Photography, including Exterior and Interior Photography! It's not just about the slightly wider angle that a 10-18mm lens or similar can provide, but a quality brand lens is usually a nice upgrade in Optics quality and light-gathering ability as well, over the cheap "kit lens" that ships with even top-notch camera brands. Don't be surprised if you feel like you're shooting with a brand-new camera once you add a good 10-18mm lens or similar!
Consider using Manual Focus, set to nearly Infinity, because your camera's Automatic Focus will have a very difficult time under Night conditions with trying to focus. Even if you review the images on-site, unless you zoom in closely you'll likely not notice the poor focus until you review the images on a laptop after it's too late.
Try some shots in daytime, of subjects more than 30 ft away, then mark Focus Ring with a Pencil Mark so you can easily check it at night, and check it often while shooting to make sure the marks still line up.
Here's an online article that offers some other great tips for Dusk/Night Photography:
https://digital-photography-school.com/ultimate-guide-night-photography/
And here's a GREAT article showing how to set up your Drone for Bracketed (AEB) photography, which works great for twilight shots! Note 3 brackets is plenty, we don't ever need 5 brackets... you'll see a setting to choose between 3 or 5 in the DJI Go menus.
https://dronesgalaxy.com/dji-drones-turn-on-aeb/
• It is recommended to experiment with these or other settings as a Test Run on a night before your shoot, so you can check the outcome of the photos and make adjustments as needed.
The MOST IMPORTANT Advice on Quality that we can give you to avoid unpaid Reshoots...
 |
 |
|||
| Too Crooked/Poor Framing | Too Blurry |
Please... CHECK your photos while STILL on site!
Review your photos before leaving the site, either on the camera or drone... or even better, from a laptop. It's 5 or 10 minutes well spent that can save you a 2-hour round trip and an unpaid reshoot. This will avoid reshoots by helping to make sure your photos aren't too crooked to use, too out of focus to use, or over/under exposed beyond being usable. It's also great for making sure you have all the angles covered from the Shot List, or that you don't have read/write issues with a camera SD card, etc. We always want to get you paid on the first trip on every job... but for us to do that, understandably you have to turn in a complete, quality job that the Client can work with.
Uploading Multiple Properties on the Same Day?
Only if you're uploading from multiple addresses in the same day: Before you upload to Dropbox.. rename the picture files to the Street Name where they were taken, for example, "Front Street.DNG" . This will help us avoid confusion as to which pictures belong to which address.
DJI CINEMATIC SETTINGS
Videos twitchy and herky-jerky instead of smooth and cinematic??
One of the most disappointing things is watching a drone video that's so smooth it looks like it's shot from a full-size helicopter, and then being unable to replicate those smooth movements yourself, especially the buttery smooth yaw movements (turning left/right), with the drone. At first glance you may think, it all comes down to skill and experience.. and that's a small part of it. But the secret that's unknown to so many is that most of this cinematic movement magic lies locked away in your DJI GO app, and within about 10 minutes with a one-time setup you can make a world of difference in how smooth your drone can be with shooting video.
Invest a few minutes of your time into the Video below, and you'll come out the other end armed with some powerful information on easily-changeable settings that will help turn your stock drone into a cinema powerhouse (note.. the whole video is entertaining to watch but contains a lot of humor and fluff... there's a Cheat Sheet below the Video that helps you save time and skip to the most important sections of the video).
The subject of the Video is the DJI Mavic.. but these same settings should also be applicable to any modern DJI drone and accessible within your DJI GO app.
**Note -- Use these Settings at your Own Risk... But they've worked great for us!!
VIDEO CHEAT SHEET (Save time & Skip to Important Sections)
Endpoint and Expo Settings -- 2:23 to 7:35
Gimbal Smooth Track Settings -- 3:00 to 4:00
Auto White Balance & Auto Exposure -- 18:40 to 23:20 |
CINEMATIC SETTINGS -- SUMMARIZED
Gimbal Start/Stop Buffer: 20 Gimbal Pitch Speed: 13 Style: Sharpness +1, Contrast -1, Saturation -1 Lock Gimbal When Capture: Off Portrait Mode: Off AFC: On Auto Sync HD Photo: Off Video Caption: On Over Exposure Warning: On Front Exposure Auto Preview: Off Center Point: Cross Peak Focus Threshold: High ISO: 100 Shutter: 60 (adjust higher if over exposure warning, multiples of 30 is best) Expo: 0.2 End Point Adjustment: 50 Make sure Autofocus (AF) Is On |
Want smooth and stunning Orbit Videos? Use the Point of Interest Intelligent Flight Mode!
You may be amazed to see some of the incredibly cinematic maneuvers that can be done using the Point Of Interest flight mode, located right in your DJI GO app inside the Intelligent Flight Modes menu! Just like you've probably seen before with the Active Track mode, you can now just go into Point of Interest mode, draw a box on the screen with your finger around your chosen "point of interest," and hit GO. Even while the drone is performing the automated orbit, you still have active control over things like Gimbal Pitch, Orbit Speed and Distance! You don't have to fight with tedious and stressful manual orbit maneuvers... watch this Video to learn of some of the amazing capabilities when you let the drone help you fly the Orbit, so you can concentrate more on flying the Camera.
Remember... If you have ANY questions, we are here to help you!
Call/Text Johnnie at 318-613-1837 day or night
or Email at johnnierhodes@aeropixel.us
Thanks for what you do every single day!
Copyright ©2023- AeroPixel Imaging Services, LLC. All rights reserved.